Tuesday 11 October 2011

Starter problem


Removed the dB killer, topped up with coolant.

Went to start car. Didn't fire, noticed the LED on the MS showing cold engine wasn't lit. Assumed I had dislodged a spade connector from the temperature sensor. Carried on cranking.

Engine missfired. Stopped cranking.

Tried cranking again and starter just whirred. Damn, hit it with hammer, just whirred.

Turns out that the ECU thought the engine was warm, so supplied less fuel on startup. This cause missfire which resulted in the engine trying to go the wrong way which broke a gear on the back of the clutch (starter gear).

Had to take out the clutch (actually took out 3 clutches as needed to find a replacement gear), not difficult on a motorcycle engine with air-tools. You can even do it with the engine oil in place as long as you can tip the engine a few degrees.

Anyway, it is all back together now. Also removing the dB killer has sorted out the boost. Getting a nice 8psi from 6kRPM (better than the 7kRPMbefore), and this can be controlled nicely with the boost controller. Aim now is to get a steady 8.25psi (155kPa) from 6kRPM to the red line with sensible fueling. Then need to work on the ignition timing and on the acceleration enrichment (which is rubbish at the moment).


Monday 3 October 2011

Of course its the dB killer

The boost was dropping off at high RPM. I asked around and it appeared that this was probably due to pressure from the gases acting on the newly ported wastegate.

So, I put in a stiffer spring, and messed with the boost solenoid control. Both of these things helped, but it seemed difficult to stop it dropping off. Really I want 8psi from 6kRPM to the red-line, maybe dropping slightly at peak RPM to avoid running the injectors at 100% duty cycle. At the moment I get 8psi at 7kRPM, but it trails off linearly with RPM ending around 5psi.

Anyway, I will remove the baffle (dB killer) tonight and see if that does the job. I am pretty confident that things will spin up even bit quicker and that the boost drop will go away as that was the characteristic before I put the baffle in.

Once it is all stable I might see if the engine (clutch really) can handle an atmosphere of boost, which is my personal target.

Sunday 25 September 2011

Turbo update


I spent ages trying to optimise the EAE algorithm values. This is a clever "wall wetting" algorithm. But I just couldn't get it to work properly, so I gave up and tuned using the normal MAPdot and TPdot parameters. It isn't perfect, but it seems to work.

I also installed a boost controller, and added a second spring to the present wastegate spring.

Here is a screenshot from tonights datalog. The acceleration enrichment isn't perfect but the car drives well enough, and it is nicely controlled under full throttle so it is safe. Presently I am running a cautious AFR of around 11.5, but all in all the tune is pretty decent and gradually improving.

Boost duty controls how much the pressure comes from the turbo pressure and how much comes from the atmosphere. Confusingly 100% means use the outlet turbo pressure. 0% will allow loads of the control pressure to leach out. This would allow the wastegate to stay closed longer and so build up more boost.

If you look at the log, for low RPM I try to keep the wastegate closed for as long as possible to get the turbo spinning up quickly. After about 7kRPM the boost controller goes to 100% so that the boost is controlled purely by the spring. The thing is that there are forces from the exhaust gases that push the wastegate open and so the boost drops off with RPM.

I should be able to maintain the boost after 7kRPM by playing with the Boost Duty Table.


Now the problems:
1) oil leak, but I know where it is and it should be easy to fix
2) water leak into oil. This is the big one, but I have a plan.
3) starting, is still a nightmare. I think this is related to low battery and sub-optimal values, but it is annoying.


Tuesday 26 July 2011

Everything I ever needed to know about Volvo turbos

Really useful video. If only I had seen this earlier!


Basically explaining how the wastegate works on a volvo turbo charger and how the boost control system works. Yeah, I know a bit dull.

Tuesday 19 July 2011

Water cooled turbo, now water cooled

I don't think I am going to win any prizes for my headline writing, but.

I've added water cooling to the turbo. My turbo bike buddies always talk about how they don't bother with water cooling. But in their installs the turbo sits right at the front in serious airflow. In my case the turbo is hidden from this airflow in the engine bay.

When I did the rebuild some of the oil was rather nasty. Sort of black and gloopy. I assume this is from heat damage. So adding a few water cooling pipes seems to make good sense. I had a few small leaks, but I think that I have now addressed them.

Pretty much time for an oil and filter change and then a test-drive.


Look at my fancy crankshaft (ooh eer)


Not sure whether I mentioned it, but the engine developed a water leak into the oil.
I ignored this for a while hoping it would go away, but once the oil-overflow bottle was actually full of "mayonaisse" I realised that it was time to act.

Turns out the top of the barrels had a nick on them. I did actually know about this when I put the engine together, but my local engine folk didn't have the tooling to sort it (aluminium with steel liners is to difficult for them) so I had hoped it would be fine (and it was for 200miles). Anyway, I found a new place (Paynes in Eynsham) who sorted out the barrels (quick service, very professional too and didn't treat me like an idiot, which is polite).

Here is a photo of the rather interesting crank and con-rods on my existing engine. There have been trimmed down a bit, with the counterweights seriously attacked, and the rods look like they have been shot peened or sintered or something (these are not the normal castings that I have on the other engines). Note also the residual anti-freeze from the water leak (oops).

I also discovered that I had forgotten to install a cam chain guide, so it was good to get the engine opened up.

When rebuilding the engine I reset the cams aiming for stock on inlet and 5deg advanced on the exhaust. This is supposed to give best power on turbo suzuki's, although I need to measure it more precisely to get it right.

Turbo porting, fast and furious


So, I had a problem with my turbo overboosting. Basically this means that even with the wastegate wide open the boost still builds so it is out of control.

This is not a good thing, because too much boost can result in engine damage.

I had temporarily addressed this by installing a exhaust dB killer (a device that reduces the noise a bit by constricting the exhaust at the outlet). This results in slightly higher pressure in the exhaust and it is the pressure difference between the two different sides of the exhaust turbine that provides the drive to the turbo.

Anyway, that was a short-term solution and did work, but it isn't ideal. The whole point of turbos is to get lots of boost and lots of boost when you want it. Decreasing the efficiency of the turbo would (in theory anyway) make boost come in later and generally make things more laggy.

So, I hit the internet and discovered that I needed to make the wastegate more efficient. This is done not by changing the wastegate, but buy making it easier for the gases to whip through the hole. As expected the casting was crude, so my die-grinder, a carbide bit and 20minutes was all that was needed to open up the flow paths so as to allow the gas flow to more easily get through the wastegate (when it is open).

Here are a couple of photos, post port (none before, sorry).

I opened the flow path, removed the sharp corners, and also increased the diameter of the wastegate hole (by maybe 1 or 2 mm).


It will be interesting to see whether this sorts out the problem.

Wednesday 8 June 2011

Sparks, Henry comes to the rescue


I was struggling to get the RPM above 8300rpm.

I suspected it was too much fuel, but wasn't sure and thought it might be that the spark was being blown out by the higher pressure mixture.

Solution? Well I was told that the Ford coilpack is what is needed. I doubted that what comes under the bonnet of a Fiesta could solve my problems at 11kRPM in a turbocharged bike engine, but reading up on this suggested that was what was needed.

So, I got it, and it revs all the way, and it looks properly OEM (which is good).

Here is a photo or two. I had to trim down the 1.6 EFI Fiesta leads slightly and insert the rubber washers that come on the stock GSXR1100wp plug ends, but I am more than happy with the end result. Especially as the engine idles really nicely and revs all the way up.


Who would have guessed that the solution would be a Ford Coilpack, but I guess it makes sense for mass produced cars to have powerful sparks as a car that doesn't start is a car that no-one will want.


Intercoolers rock


Here are some photos of my new intercooler.

I installed it over the last few days. Previously inlet temps rose to 60degC now as long as there is forward motion they are tagged at around 29degC, massive result. £69 for the intercooler 2fast2cool (or some other nonsense name).

All the silicon bends were a bit pricey (£12 a go) but they look nice!


One for my dad (bonnet decoration)


For the longest time my father has been disappointed by the quality of the inside of my bonnet.

I had put in a bulge to fill a hole, and the resulting mess on the inside wasn't that nice, then I had filled some holes which were also ugly. Also I had bonded in some wheel arches which were pretty ugly too. Basically my dad was right, it was ugly and needed sorting.

I had already decided that I needed to insulate the bonnet to prevent it catching fire (I measured a temperature of 95degC after a gentle run!).

So I took it off and painted it black (cellulose paint) and glued on some insulation.

Not much else to talk about, but it is much prettier (for people who care about this stuff)


Sunday 29 May 2011

Steps forward (and the odd backwards)


I started tuning the car this weekend. Running blended TPS and MAP. This means two tables (one is TPS versus RPM, the other is one is MAP versus RPM) that are multiplied together to determine the fueling. This is a quirk of ITB, as for many installs that use a single throttle body the MAP provides all the information needed. I guess that the flow isn't well formed after the ITB, so it isn't a simple relationship between the MAP and the amount of air going into the engine.

Anyway, tuning blended is tricky as all the tools assume a single table. Not impossible though.

So, I started with some kind of credible table.

Then Ran autotune on the MAP vs RPM, which improved things. Then I did the same again using more throttle and rev range, and things got better. Then I collected a datalog and used MLV (megalogviewer) to optimise the TPS vs RPM table.

All was reasonable. Then an autotune of the MAP vs RPM, and finally things were running nicely. It seems that I keep trying to change up to a higher gear. The car pulls nicely at 2kRPM and I get positive boost at 3kRPM even on a closed throttle, so the cruise is quite relaxed. There is a nice chunk of power at 4kRPM which builds in a quite scary fashion from 6kRPM.

I have put an dB killer into the exhaust. Two reasons. 1) neighbour annoyance reduction device 2) increased backpressure in exhaust. The second of these is counter to turbo logic, but it means that the previously inadequate wastegate now manages to control the boost almost adequately. Previously I was getting 0.7atm boost at 8kRPM, now I am getting 0.5atm of boost. In theory the spring should limit this to 0.33atm, but at least it is sensible.


The other thing that I wanted to do was to draw cool air into the intake. The intake is adjacent to the exhaust, and although the airflow should steer hot air away from the intake, it was always a worry. Now I have boxed in the filter and it only gets air from the outside (behind the front wheel, which isnt' ideal, but at least its cool). It turns out that this makes no difference at all!! The turbohousing itself gets pretty hot, and the pipework in the engine bay is aluminium and also seems to collect lots of heat, so although nicely made it seems to offer no benefit! According to the logs I was getting air temps of 58deg before and now they peak at 61deg. I am running a bit harder now, but either way it is rather disappointing. C'est la vie.


Back to the tuning. Car is now running like a demon to 7kRPM. Clearly I am a bit intimidated because the logs show me backing off the throttle as the revs rise. The problem is that at around 8.3kRPM things go a bit ugly. Stuttery with reduced power. Even the MAP drops off sometime. I tried adding more fuel. I don't want to lose the engine to detonation and there were some lower AFR readings, although they were all over the place.
Next I tried reducing the advance by a further 3 deg. At the moment I have it taking 5deg when at 8psi, and the base table is retarded by a couple of deg versus the NA set-up.

Here is a screenshot from Megalogviewer

The RPM gauge is wired into one of the coil channels (low tension) and it doesn't stutter. I don't know about the other channel.

The sparkplugs look alright, slightly red for 1 and 4, not sure what this is from (slightly worried because the anti-freeze is red) but hoping it isn't from that! The leads measure 16kOhm from spark plug to spark plug (dyna green 3Ohm coils) in both cases.

I tried increasing the dwell from 40% to 50% and that made no big difference, maybe some of the changes improved things a little, but nothing massive in any cases.

So, not sure what I have to do to fix this problem. I think it might be the spark blowing out, so have replaced the plugs with Iridium plugs, and closed the gap down slightly. But haven't tested that configuration as yet.

While I think about it I think I will fit an intercooler. From the Stoneleigh show I realised I could copy the way that Raw-Striker had fitted the intercooler to their show car, that is, it can be wider than the chassis at the front, which will make sourcing an intercooler much easier.

Also I need to fit heat shielding to the bonnet and paint the bonnet on the underside. Quite a bit of tidying to do here, but I measured the temperature at 96deg C (stopped after a run) which is scary hot and I don't want to burn my bonnet (or any of the car).


Car started reliably. Idled nicely. Didn't overheat. Really feel like I've turned a corner. Slight oil-leak, but it looks easily fixed! Happy days.

Tuesday 24 May 2011

New timing wheel, glowing turbo


Reinstalled the 12-1 wheel, and started up. The throttle needed opening pretty wide to get a stable idle, which was surprising.

Went for a drive and it wasn't pulling very well. Fueling not great probably, so I optimised it at the side of the road a bit. Helped a bit, but still not great.

Then it started getting dark, and I noticed the exhaust glowing really brightly, this heat went all the way back to the headers which were glowing (less brightly, maybe blood red). There are air holes in the bonnet and in the dark this was really visible. So, I stopped by the side of the road and advanced the ignition by 5 degrees. Immediately the RPM shot up and I had to close down the throttles. Clearly the timing was way out and so I added another 5 degrees. Engine started much more crisply, and turbo glowed less, added another 5 deg which only helped.

I need to get the trigger wheel timed in properly, and also put some insulation on the underside of the bonnet.

According to my calculations the turbo is getting up to between 745 and 790deg C.


I need to sort this out before I cook the oil and block the turbo from getting any oil.

This also reminds me that I need to sort out the insulation for the underside of the bonnet.

trigger wheels

I ended up going back to the original trigger wheel. This is a 12-1 wheel (that is teeth spaced at 30degrees but only 11 of them, so 12 teeth minus 1).

I rebuilt the LM1815 trigger circuit, this time putting in the proper input filtering 15kOhm with 2nF(why do they refer to these as 2000pF) capacitor. This yields a low pass filter with a cut-off of f = 1 / (2*pi*2nF*15kOhm) = 5.3kHz. As there are 12 teeth and max RPM is 12000rpm, this corresponds to 200 engine rotations per second, and hence 2400 teeth per second, each tooth gives sinusoid so the cut-off seems to make sense.

I am also using the adaptive functionality of the LM1815. My hope is that this will be less sensitive to slow cranking (something that can happen as the battery goes a bit flat). This does seem to work, and I have blipped the throttle to give just over 6kRPM.

Keen to test, but too many other things on at the moment.


In other news:
Refitted the exhaust and bolted in a baffle at the back end. The car is a bit loud at the moment, and also I am having some boost creep problems. A little more back pressure may help with the boost creep, and the baffle does help with the noise.

Also welded up a couple of holes in the down pipe next to the Lambda probe.


Next plans:

Sort out the tuning. Bit worried about the spark timing, as it is a pain to configure.
Paint underside of bonnet and fit heat resistant shield
Install intercooler brackets, work out pipe runs and get intercooler welded up.

Friday 20 May 2011

Post Stoneleigh fixes

Bought a replacement fuel pressure regulator. Too many question marks over the cheap McGill one, so got one from FSE (Malpassi) which seems to be a reasonable quality product.

Need to vent to the engine inlet (for environmental reasons mostly, but also because with present venting it gases the driver).

Compression isn't great on this engine. 8.6, 9.6, 8.0, 9.3 but all engines are test engines, so it doesn't matter much!


Need replacement manifold bolts, presently running a grab-bag of random bolts.

Need to sort out the trigger wheel above 6kRPM. Its a bit strange as this worked before, and now doesn't. Probably plan to go back to the old 12-1 trigger wheel design as that worked pretty well and ran smoother than the suzuki wheel ever did.

Bonnet insulation requires sorting because the bonnet got super-hot the other day. I've got the stuff, but want to combine it with painting the bonnet, fixing the damage, and insulating it.

One of the clamps on the exhaust fell off on the Stoneleigh run, so I need to sort that. Probably also fit an exhaust baffle to quieten things down that may even help with the over-boosting that I have. Not sure, but it was cheap from a mate and easy to fit.

Thursday 5 May 2011

Stoneleigh success (ish)


I got to Stoneleigh and back.

Trigger wheel failures above 6000rpm.
Tune isn't great.
Exhaust clamp fell off.
One fuel injector is gummed up
Engine vents gases into cabin
Problem with hot starting (trigger wheel related I think)


Nothing that isn't easily fixed. The only bad one is the "heavy breathing". It seems to be blowing off something more that air. Not sure what is going on there, but it may improve. COmpression test wasn't great yielding 9.6, 8.6, 9.3, 8.0. Which is disappointing.


Interestingly I did a massive datalog all the way to Stoneleigh (50mins) which showed up some interesting tuning features.

I had read that you could run a tuning map that was based on MAP and RPM. It actually turns out that TPS plays a significant role (my finnish buddy Arttu told me this, but he is in the minority of 1). I have put the whole log file into the computer and simulated different maps. It turns out that Alpha-N with multiplicative MAP scaling is pretty close to perfect. I am going to run a MAP table so that I can tidy up the low speed running (where MAP works really nicely).

If you look at the megaviewer screenshot, you can clearly see the AFR (air-fuel-ratio) modulating with TPS even though MAP stays pretty constant. When running the TPS didn't affect fueling, and clearly it should.

Friday 29 April 2011

Falling towards Stoneleigh


The Stoneleigh kit car show (Warwickshire showground) is the "largest kit car show-- in the world", and is a good place to meet up with virtual friends from the internet world with a common interest in car stuff. It is free to attend if you arrive in a kit car, and I have never managed to take advantage of this (this is only the second year that I have had a road legal car).

Anyway, the plan had been to put the new engine in map it on the road, and then drive to Stoneleigh. Simple.

That is still the plan, but there was set-back last weekend when the triggering failed and I ended up getting towed home. (BAD).

I have since fixed the ECU. It turned out to be a dead ignition driver, that combined with carboned up plugs and a low battery. I still don't really understand why the triggering wasn't working, but when an ignition driver fails I think it can stuff up the earthing, which can corrupt the trigger. The triggering circuit was designed by me (and hence a bit random), so I assumed it was that, and adjusted a couple of things. Anyway, I tidied up some of the cable routing too, and sorted the shift-lights, also I built a megasquirt simulator, and used matlab to output representative trigger signals (via the headphone output) for the MS to trigger from.

So, after installing and testing, and testing and installing the engine fired up from its own battery this morning. I think the batteries (both the normal bike battery that I run, but also the backup battery, which I use when starting is a problem) were flat, so have charged those, and have ordered some Anderson connectors (these will allow me to use the bigger battery whilst driving, as the jump leads can fall off, so I presently can only use the big battery for starting).


Anyway, back to the plan. Here is a list of things I need to do before I can leave:
1) Oil change (the present oil is contaminated with everything, it has seen over fueling, a track day, about 1k miles, and most recently a cracked barrel), I get lots of interesting vapours from the vent which are very petrol based). So a new filter and oil fill are a necessity.
2) New lambda sensor. The cracked barrel put water into the exhaust which knackered the old Lambda sensor. This is a bit annoying because they are expensive, but it is essential to have these signals to map against, so I got a new one. Hopefully this will last.
3) Mapping. This is the big problem at the moment. It seems that it should be possible to map it using the MAP (manifold pressure) (also known as Speed-Density), but then again some folk say you need to take the TPS into account. At idle MAP is fine as the turbo isn't doing anything, at high RPM its fine as the throttle is open and its all going on, at intermediate revs is where the problems happen (4kRPM) as the throttle is fairly closed but the turbo gives a bit of boost. I think I need to include TPS (megasquirt allows this).

The problem is that although I can probable tune using MAP before Sunday, but tuning to include TPS would take too long. So I am hoping that I can manage the "cruise" settings. A 70mph cruise is about 5.8kRPM so I think the turbo will give about 5psi of boost, so that should take me out of the difficult region. But it could make for an interesting drive!

Hopefully, I can go and do a few datalogged runs, which should allow me to get the tune to a point where the car is driveable. If not then its Stoneleigh 2012.

4) Other tasks. Bolt down the ECU. Set up the sat-nav. Install speedometer (optional as sat-nav). Get together a tool-kit and spares. Tyre pressures. Top up water levels.


A bit nervous (silly really as it doesn't matter!)


Monday 25 April 2011

Engine runs, but got home on wrong end of tow rope

Lots of progress. Mostly good, some bad.

The last set of cylinder barrels got cracked owing to boost combined with already high compression, and me being an idiot by not stopping sooner.


So, I built up a new engine.

1192cc barrels (up from stock of 1074cc)
New head gasket
3mm base spacer (to lower the compression)
Stock head and valves (not the big ones)
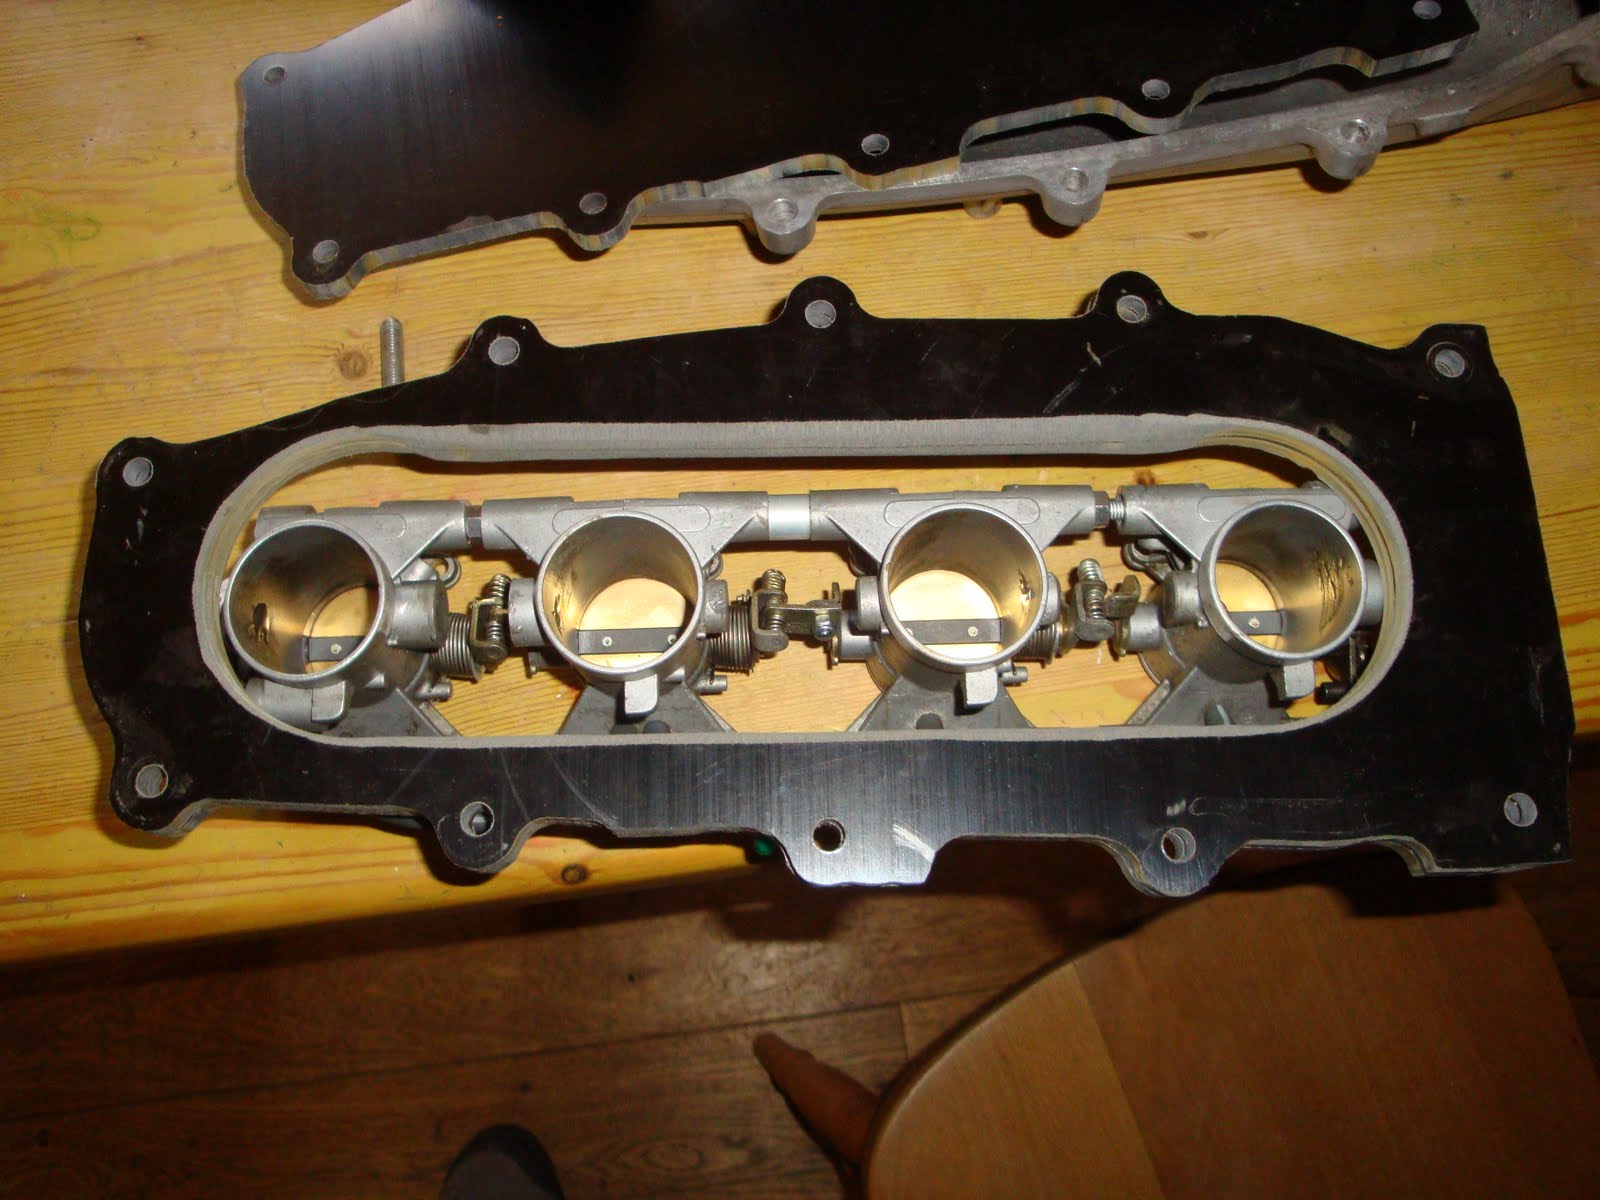
gsxr600 TBI's

Sorted out all the little things (like valve shims), and valve guide seals (gsxr1000k5 ones are the same, wemoto sent me the gsxr1100 oil cooled ones, which are wrong, so look out for this).


Got the engine in, topped up with fluids, bolted together.

Fuel leak, fixed.
Fuel pressure too low (fuel pump leak inside tank) fixed.
Throttle position (too wide open due to sticking choke cable) fixed.

Got it to idle, and seemed to idle lower than the last (Kent) cams at around 1100rpm. Throttle is still more open than is ideal, but its a detail.

Finally (4pm Monday) got out, went to fill up. Car ran poorly. Not smooth (felt like 3 cyls) but reved a bit and seemed to sort itself. Filled up with fuel and the car did restart (a bit surprising). Thought about heading back, but decided to do a longer up the bypass run. All went fine, rubbish jumpy spot just as boost comes in (3-4k), so that needs some mapping work (unfortunately the O2 sensor isn't working nicely at the moment, maybe needs calibrating).

So, I datalogged, and got 10psi at 8.8kRPM, which should be worth a few BHP. At the moment I don't have an intercooler and intake temps got to 65degC, but the lower comp engine didn't seem to mind (no detonation). The engine gave decent power from 5kRPM, and popped and banged like a crazy thing on the over-run (quite nice, but probably should turn it down a bit). I think the fueling is rich up top, not sure what is happening at 3-4k though.

Bad news, going around the Woodstock roundabout there was a bit of a plastic burning smell, not sure what that was. Then coming back along the dual carriageway I stopped at the traffic lights and the engine idled fine. Then it cut out, and the lights changed. Tried to restart, but failed. Eventually pushed to side of road and tried to fix the problem.

Not sure what it was but ECU wasn't happy, and it dumped gallons of fuel into the engine (bad news). Couldn't get the ECU to recognise the trigger, which is a wierd fault. I have a few suspects:
Blocked injector (I was messing with the fuel lines, so could easily have blocked an injector).
Megasquirt hardware problem (need to bench test it)

I'm keen to get the car to Stoneleigh.

List of things to sort:
Lambda sensor (I need a better map if I am going to go any distance)
Megasquirt (I need to get the engine running again)
Speedo (this is needed as at present I have to guess the speed). Not essential.
Oil and filter change (maybe fix the odd tiny oil leak whilst I am at it)


So, mostly good, but lots to do.

Sunday 20 March 2011

Progress, but now the water has got out


Went for another run.

Turns out that I had blown the head gasket the last time I went out. Still runs and goes, but over heats and plumes of white smoke on the over-run.

Not a big deal as this was always a disposable engine. Plot shows the megasquirt log of a run. Shows a few things:

1) fuel pressure in the rail drops (gsxr1000 pump isn't man enough) and engine leans out. This is bad, but I have an uprated pump to fit.
2)it boosts, apparently to 0.33Atm (i.e. 5psi, same as spring) and then I get more boost, but it goes up more slowly, to around 7.5psi.
3)internal dump valve might be a bit whoosy. MAP is measured after the throttle plates, but even after the plates are closing the pressure stays high. This indicates that the dump valve isn't dumping (easily fixed, but I'd need to get on e-bay).

Lots of other stuff, but basically, it is mad, and broken.

I need to book the kitchen table to get it up and going again.

Thursday 17 March 2011

Boost seen!

Went out for the second run with the turbo on.

The first run was a disaster as I dropped my bike helmet onto the laptop screen, which cracked and put a swift halt to a tuning session. I only replaced it yesterday. It did highlight that I needed to protect the bonnet from the heat from the turbo.


So today, I drove a short maybe 10mile route at a steady pace collecting data and gradually becoming braver.

The good news, I get boost (5psi spring, which seems to give me 7.5psi at 7krpm). The fueling isn't great at the moment as I am having to build a new table (the old table was Alpha-N, now I am going SD), but that is something to iterate on. The engine is now officially mad. It was mad before from about 7krpm, now it is mad up to 7krpm too! I didn't rev above 7k today, as I want to get fueling approximately right first.

The bad news. Stopped to fill with fuel at the petrol station (still got last years fuel in), and I flattened the battery trying to restart. Mostly this was my fault (flattish battery, careless when turning the lights on as they are HID and so require a blip to avoid the engine cutting out!). So I need to charge it and set up the warm-starting fueling. Nothing too difficult, but I ended up having to walk home to collect a battery which wasn't in the plan. At least my wife got a laugh out of it.


The exhaust sounds nice too.


At the moment it is running slightly lean, which is really bad for a turbo engine, but that is easily solved. So, I'll get the battery charger on tonight. Looking forward to the weekend!

Sunday 20 February 2011

Startup video

Lots more to do (fuel pump, injectors, fuel pressure regulator, manifold leak, air filter, tuning, intercooler)

But here is a startup video.

Manifold problems


Tried to finish the manifold, but when I welded the collector (this is where the pipes come together) it came together alroght, but the the heat (actually the cooling) caused all the pipes to point in the wrong directions and not match up with the exhaust ports.

Damn, all my work for nothing. Planned to cut off the flanges and start again. At least I was getting a little better at welding.

In the end I decided to cut and weld in extra metal to make it fit. Not pretty, but I can always build another manifold next winter. So, I did that and it fitted the head again, I bolted it up and started up. Very loud.

Lots of gas escaping between head and manifold. All the pipes fitted the holes, but the faces were not 100% parallel, so were not sealing.

So, I built a frame to hold the manifold, and filed down the ends so they were all parallel. THen I checked for leaks, and found loads (20 maybe), so I welded all of those up, and.... guess what, the manifold doesn't fit the head again. This time I used brute force and ignorance to cold work the pipes. Then I had to file down the ends again, and then eventually bolt it all up.

These short paragraphs took me 2 complete weekends. This is ridiculous as all the problems were completely self inflicted. When making manifolds, make the collector first, and then check for leaks, if no leaks then join the collector to the head. Alternatively, tack is, and get someone with TIG to weld it up (less heat, less distortion, neater welds). That is what I will do next time.


Anyway, I bolted it all up and I still have one small leak between head and manifold. I will file it a bit more, and get new gaskets. They are the crush type, so should compensate for any small inaccuracies.


Here are some photos of where I am;

Sunday 30 January 2011

The long todo list

I was communicating with Tim the other day and worked out my list of things to do. At the beginning of a project I try to avoid todo lists, as they are long and tend to put me off starting. Also the list just gets longer as more things are found, which is a be depressing.

But now seems like a good time for a list:

Welding up a few tiny holes in the collector: need to find someone with TIG, or attempt this with MIG. Probably need to make a support to stop the headers warping from the heat.

Making gaskets for the turbo interfaces (just a bit of copper sheet that needs cutting). Done

Bond and seal the inlet plenum. Done

Brackets to hold plenum to engine, otherwise the boost will pull the plenum off the ITBs.

Oil return to engine (got the bits just need to drill and bond). Drilled and bonded. Done.

Oil return hose needed, just some 5/8 oil resistant hose.

Fuel pump (present pump doesn’t pump enough). walbro 255 bought (gss342) is a plug and play swap. Need to put pump together, and test. Present plan is to use external regulator, but standard filter, so epoxy in the stock pressure regulator.

Fuel injectors, to purchase s2000 injectors, can’t find them anywhere. Sourced from s2000 owner in USA. Hopefully they will arrive in a week or so.

Fuel pressure regulator. Bought (£25 from McGill Motorsport). done

Fuel return hose to tank and into tank.

Finding a good place to mount the intercooler

Plumbing the intercooler

Work out how I am going to manage boost control (probably rely on the existing dump and wastegate in the first instance, but I need to test these first, subsequently I can wire up megasquirt control of this and run a boost map)

Configure the megasquirt to run a boosted set-up.

Ideally I need to replace the head on the engine, and put in a cylinder spacer to drop the compression (this should also fix the oil leak that is becoming a bit serious, 1litre per 100miles!). But I may have a blast with the high compression engine first. Parts found from US supplier 2mm spacer should drop the compression to about 9:1, which would allow a safe 1atm boost.


Back out to the shed now to get moving on the plenum mounts.


Wednesday 19 January 2011

Plenum completed


Had a brainwave and realised I could reuse the airbox rubbers from the gsxr600.

So, drilled and machined the backplate and fitted them. Snug as a bug.

After building up the airbox sandwich I had a look to see how it fitted in the car (actually I did this first). Absolutely like it was supposed to be there. Awesome.

Still need to sort out a gasket and some bolts, a bracket to mount the plenum to the engine, a way of mounting my obscenely large intercooler (perhaps a purchase too far), intercooler hoses (how much does silicone hose cost? too much), some larger fuel injectors, and a larger fuel pump. Great progress though.

Tuesday 18 January 2011

Plenum planning


I worked hard to make a nice airbox on the gsxr engine. Now I am turboing the engine I need an airbox that can handle the elevated pressure. The pressure might be as high at 15psi, which results in big forces over the area of an airbox. For example if the airbox were 14inch x 6inch then the net force of 1200lbs on the wall of the airbox. This means that something strong is needed!

Enter the Nissan Pulsar GTiR Plenum lid. The Nissan Pulsar is a turbocharged monster of a little car. Fortunately it has a plenum that is modular. So you can bolt a plate to it, and in the plate you can put mount the throttle bodies.

They say a picture is worth a thousand words, lets hope so.

The black stuff is tufnol. I used 1/4inch tufnol, because I wanted something that is fairly thick to resist the force from the air pressure, also tufnol is relatively low density (1.4kg/litre), has good temperature resistance (120deg C) but mostly I used tufnol because I had some hanging around and it can be machined using a router.

So I made 3 back plates and then turned 2 of them into spacers. In the process I covered the whole shed with fine black dust!

The next step is to mount the throttle bodies to the back plate. I think I can use the existing gsxr600 rubber mounts, which would be excellent, but I need to make some holes in my new backplate which is a bit scary.

Exhausting progress


I started on the downpipe and measured up for some tubes. The word is that turbos need as little back pressure as possible, so the reason for the big downpipes.

The outlet from the turbo is 70mm (2.75in) downpipe, so it made sense to match that. So I measured up and worked out what I needed. The plan was to reuse the existing silencer (which is big and heavy but nice and quiet) which is 2inch input. So I bought a couple of 45degree 70mm bends. Once these arrived I realised that in my calculations I hadn't accounted for the length of the bend and there wasn't sufficient space before the silencer. So, order new silencer from Jetex which is a bit shorter, and slightly larger bore (2.5inch, you can't get them in 2.75in), and a 45deg bend in 2.5in for the tailpipe.

To get the 70mm down to the silencer I cut 2 8inch long wedges from the bend and then closed that up with a couple of exhaust clamps and then welded it together. I am not much good at welding, but by putting an aluminium tube under the weld means that burning through isn't a problem and the backing reduces the need for purging the weld from behind (something I don't have the luxury of).

After loads of cutting, welding, measuring, grinding etc I ended up with this.

I need to clean up the weld in the middle of the downpipe and weld the downpipe to the flange.


Finally I bolted it all up, welded up a support bracket with a captive nut, and modified the tailpipe to allow it to exit from the side of the body (its great being able to weld, even if I am rubbish at it).

Sunday 2 January 2011

Turbo looks a bit big in there


Hmm, bolted things together today.

The manifold doesn't clash with any chassis tubes.
The turbo looks pretty horizontal (not important but it looks proper), and points backwards.

Problems at the moment are that the compressor outlet points up into the bonnet so will need a sharp bend, and the turbo inlet is a bit close to the bonnet (about 3inch) so will need an elbow on the inlet.


,


I'm thinking that the hot turbo close to the underside of the bonnet will need some thought not sure what to do though.

Managed to take some measurements so I know what oil hose I need, and measured up for the turbo exhaust outlet.

Need to think about clocking the turbo (that is turning around the two housings relative to one another).


manifolds aren't as easy as they look!

Update:

When people ask for advice, why don't they take it???? well in my case I had gone to far already, and I don't know anyone who can tig local to me.

The good news is that when the 12mm turbo flange distorts you can "machine" is back to flat using the flat face of a grinding wheel mounted in an angle grinder (remove the guard, wear gloves)

The bad news is I am a rubbish welder. Don't try to learn to weld on a manifold.

It has been an interesting challenge though.


Do's and don't of making a turbo manifold.

Do:
Draw up flanges in CadStd and get them made by andyw7de
Ask andy to supply a few offcuts of the same stuff to sort settings
Butt weld the pipes
Get a B&D power file and loads of belts
Get a new angle grinder because your last one broke
Think about how you are going to do all the welds
Tack it and then get someone to Tig it!


Don't
Try to learn welding on a manifold
Start welding (beyond little tacks) before finishing off all the pipes, as its difficult to get access later on.
Overlap pipes, well it seems to work, but looks rubbish
Think that welding is easy
Weld it when it isn't clamped up, as it will distort


I've still got a few holes (in the merge), but hopefully I can bodge that together. Then I can watch it all crack when I put it on the car!


Its all about the journey!