Sunday, 30 May 2010

A weekends airbox building


I spent the whole weekend building an airbox. It isn't obvious how to build an airbox. Lots of talk on forums but generally it is a bit of a mystery. Lots of talk about how the manufacturers must have got it perfect (because of budget). But actually they have some pretty serious restrictions (size for example). In the case of the gsxr1100 airbox, the design isn't of a very complicated design. It is designed as a Helmholtz resonator with an inlet of 50mm diameter, and 57mm length, although I am not sure about the volume. Further the flow to cylinders 1 and 4 is restricted a bit by the location of the frame.

Finally, I want to try secondary injection having those injectors in the air box firing down the trumpets. The idea is that injecting the fuel earlier allows it to mix up really well with the air, and also it extracts some heat from the air, which increases the charge density (cool air is denser than hot air). The net effect is that more oxygen gets into the cylinder, and also the fuel that is there is really nicely mixed up. Allegedly this is worth 5% bhp, and it popular on the latest sport bikes (cbr1000rr for example) and as it adds cost clearly they believe it worthwhile.

The result of all this meandering is that I need an airbox that won't burn, or dissolve in petrol.

Also I am keen to boost the airflow.


Requirements were:
Decent volume (>8 litres is an Andy Bates recommendation that I have read)
Cold air feed with diameter of 75mm
Interface to gsxr1000 TB's
Fits under bonnet!
Metal and not flammable
Mounting for secondary injectors
Manufacturable by me

So here is the design (made in cardboard)


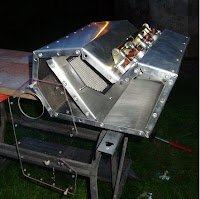
And a few hours (and hours) later.


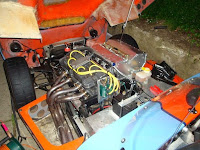
And finally fitted in the car. Its all a bit WW2 fighter control but I like it. The reason for the plexiglass window is so that I can see what is happening with the secondary injection (where is the fuel going).


I need to work out how to layout the pictures in this!!!!

Wednesday, 26 May 2010

Air box improvements and knackered engine

Bit of a discovery;

Old engine airbox on, no pipe connected to it, MAP pressure maximum of 96 drops to 93 at 10300 and full throttle.

New engine
with the airbox on an the pipe connected to it, the MAP pressure has a maximum of 96, as the revs rise at full throttle this drops to 91 at 10300 (drop of 5)

with the airbox off, but filter still in place. The pressure starts at 98 and drops to 95 at 10300 (a drop of 3)

Need to connect the airbox up, but remove the pipe, just to confirm that this drop isn't due to the pipe

It could be the pipe, or the back of the airbox.

With the back off the box I got loud aggressive noises at 5-6krpm, but it felt strong, the AFR wasn't particularly high, so although it felt strong it might not be getting much more air.


BUT, if I am getting a 2kPa drop from the bits between the trumpet and the map sensor take-offs, then I must be getting a further 2kPa (at least) from the more restrictive gsxr750 inlet rubber bits.

So, if I change to gsxr1000 Throttle bodies, I should lose some of the 2kPa, and also gain a further few kPa from the inlet rubbers. This should take better advantage of the porting that has been done to this head, and maybe release the big power.

I think this engine should be worth 180bhp (which is the limit of the injectors) with the bits that I have if I can set it up correctly.


Engine status update.
I have been losing oil since the rebuild, maybe 3litres in 300miles, and it isn't a leak as the rear right tyre (next to exhaust) was very very grubby. I had hoped that it was a combination of overfilling (with oil) and the engine breathing into the air-box. Also the bores were freshly honed, and this can cause some oil loss (I am a dreamer).

Anyway, I measured the compression on the engine. 8, 15,15,15 (all in atmosphere) so the front cylinder is down. Either damaged bore, damaged rings, head gasket or leaking valves. Measured the valve gaps, and it isn't leaking valves. I measured the compression after building the engine, and it was fine, so a ring wasn't broken on installation. It gets worse as the engine warms up (I think, although I haven't checked compression with a hot engine) but the oil would get thinner and so leak more easily.

Basically I need to sort the engine, which probably means a new set of barrels (the current ones are overbored to the maximum, so nowhere to go). Three choices:
1) go back to the 1074cc barrels, and pistons (stock)
2) rebore the 1074cc pistons and get new rings and head gasket (£300) to go back to 1146cc
3) purchase the a big bore Wiseco kit and rebore the 1146cc damaged barrels up to 1198cc. More power!!!!

This way I can built up a new 1198cc engine with a crankshaft that keeps the balancing weights. I can then transfer the special head over with the gsxr1000 Throttle bodies.


I need some more pictures!

35W my arse

35W HID drawing too much current

So, as a follow-up,

The rear lamps suggested by Razman turned up and they are excellent. I had tried some other ones, but to be frank the brake lights were inviting an accident. Razmans ones are the business (shipped from China, so not that quick).

The front sidelights turned out to be nice little units (and cheap).

So, the sidelights (from and rear) now draw 0.5A. This is down from around 2A. Also the break lights are still good, and the sidelights are actually a bit brighter FWIW. So all good there.


The HID kit arrived. I ordered a 35W, 6000K set, in bi-xenon H4. This uses a solenoid to move a shield to switch between high and low beam. Took a few days to arrive (China again), was a bit cheap and nasty when it arrived, but it was cheap (£46 including shipping and everything). No instructions (which may have been because it was opened in customs, or maybe because its crap. So, doing an install when you know the thing can generate 30kV with no instructions (at least it wasn't raining yesterday).

Installed it over the last couple of evenings (not made easier by having no earthing points on the glassfibre bonnet) and some of the wiring (the little connectors to the solenoids for dip/main) are of poorer quality than the rest of the kit, which isn't too awful.

Disappointingly, it isn't plug and play. I had to run a power lead back to the battery (the start-up currents are very high). So 20-40 mins, was really about 3-4hours. once holes had been drilled and all the bits mounted.

So, fired them up and they are nice and bright, but not evil. Also I took the opportunity to adjust the beam (one was a bit low). All good so far.

Then I measured the current.

7.7A on dipped (46W), 8.4A on main beam. THere is a further 0.1A going into them from another line (probably powering some control circuitry).

Now, call me a pedant, but 35W x 2 at 12V is 6A. The whole point of this exercise was to drop the current, so I have saved 1.5A when I was expecring to save 3.5A. I am sure that most people don't care about an Amp here or there, but I do.

The chap (dizaa8) is going to get some questions from me and likely a negative feedback if he can't sort it out, I am sure he will think I am mad, but I can't be sending them back (£37 postage is what he charged, £9 for the item) and messing around.


Hmm, maybe I will move to a blogg format for my kit-car diary.

The talktalk one is a bit pants.

I wonder if this supports pictures;